
Make DIY Puffy Gift Wrap using shaving cream and glue! It’s super fun to make and kids will love it!
This project has been compensated as part of a social shopper insights study for #ElmersHoliday #gluenglitter #collectivebias #CBias
With Christmas just around the corner, it is time to start wrapping gifts! I am one of those people who loves wrapping gifts! I wanted to come up with a fun way to decorate my packages and a school project my daughter, Vanessa, brought home came to mind. She made 3 different kinds of clouds using a mixture of glue and shaving cream. I thought that would be the perfect effect for snow!
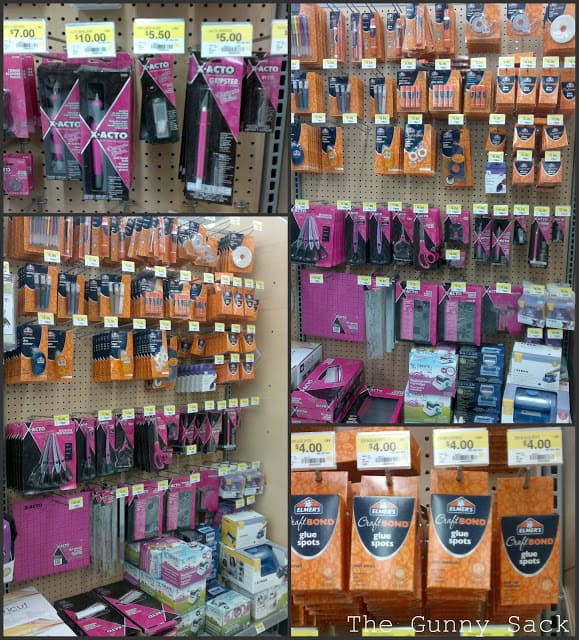
So, I went to Walmart to pick up some supplies. I love the Elmer’s Memory Keeping and X-ACTO products in the scrapbooking section. I already own several of the products and use the all of the time, as I’m sure you’ve noticed.
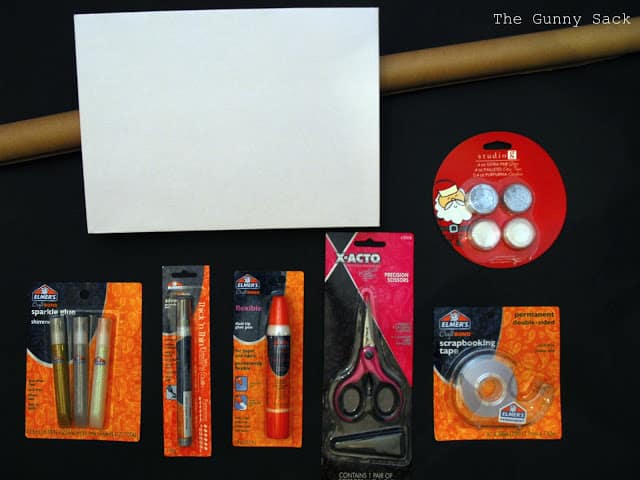
Once back home, I gathered some kraft paper, boxed gifts and glitter. #CBias
And the items I purchased from Walmart:
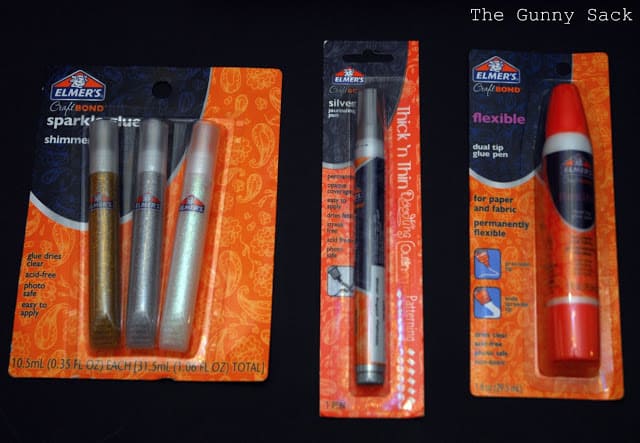
Elmer’s CraftBond Sparkle Glue – Shimmer
Elmer’s CraftBond Journaling Pen – Silver
Elmer’s CraftBond Flexible Dual Tip Glue Pen – For Paper and Fabric
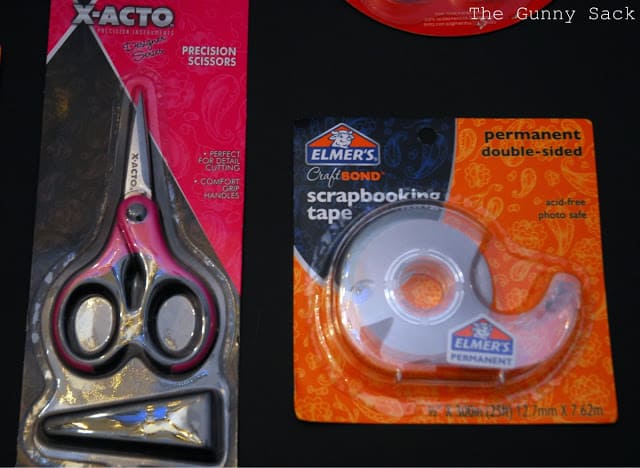
X-ACTO Designer Series Precision Scissors
Elmer’s CraftBond Scrapbooking Tape – Permanent Double-Sided
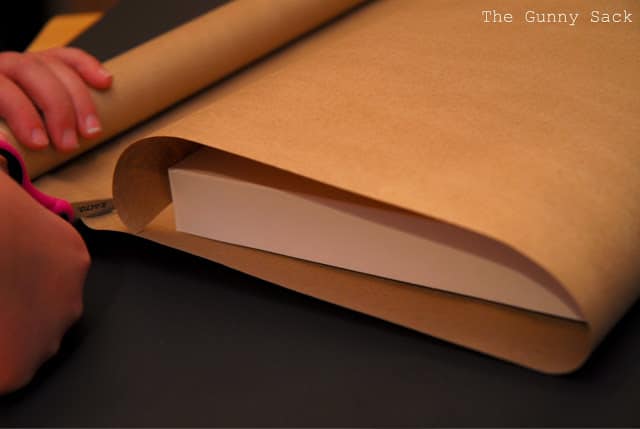
I set the box on the kraft paper and made sure the paper reached all of the way around the box and then cut it. I trimmed off any extra along the sides too.
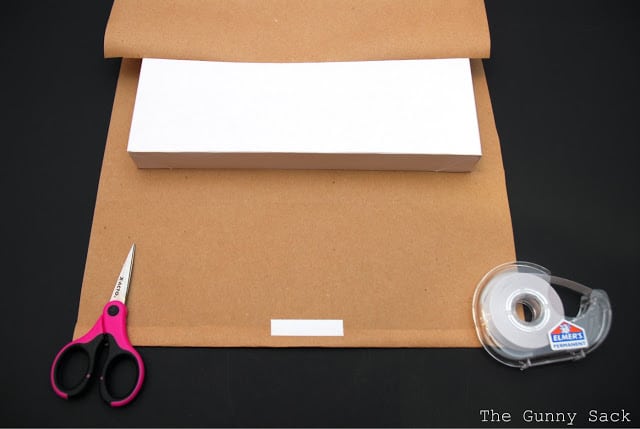
Then, I centered the box on the piece of kraft paper, wrapped one side up around the box and held it in place with a piece of the Elmer’s CraftBond Permanent Double-Sided tape. Then, I folded the outside edge back a bit, put a piece of the tape in the center to hold it and wrapped it around the box to meet the other piece of kraft paper.
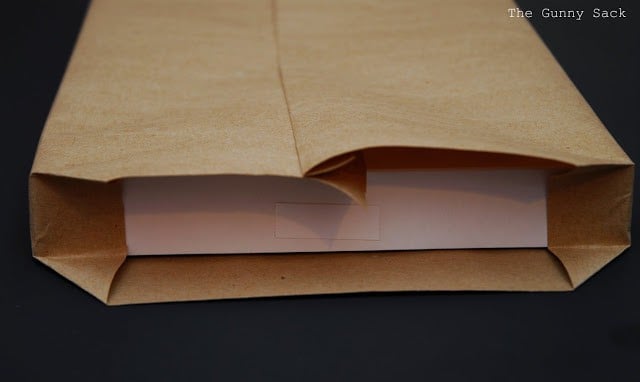
Then, I folded in the outer edges and creased them. I place a piece of tape in the center and after removing the tape backing, folded down the top flap.
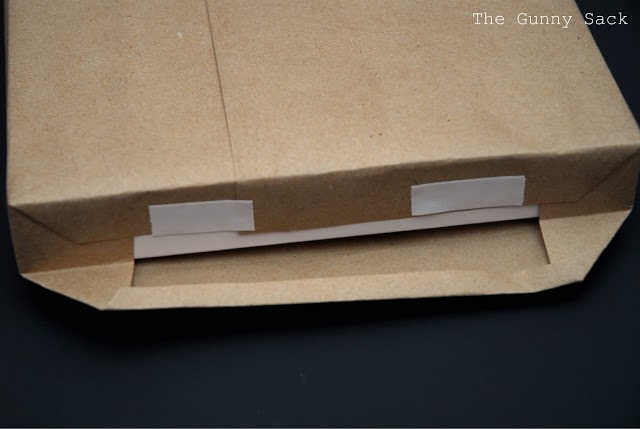
Next, I folded back the outer edge slightly, so I had a nice edge and then folded that flap up and taped it shut.
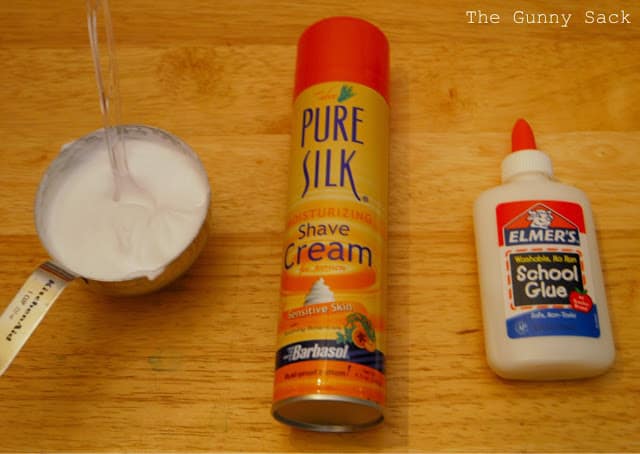
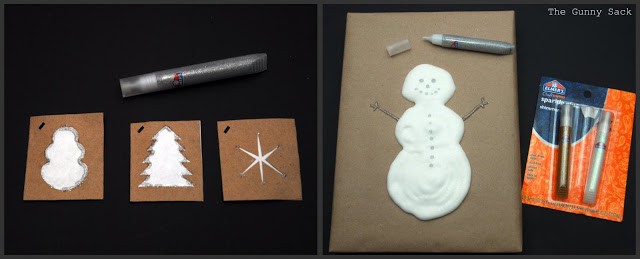
To make the white foam, I mixed equal parts of shaving cream and Elmer’s School Glue. You can also add food coloring at this point, if you want colored foam.
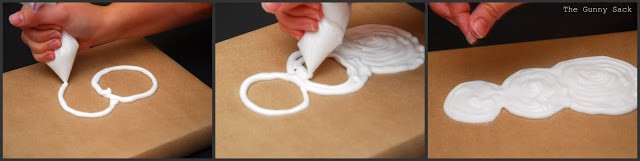
I added the white foam mixture to a plastic baggie with a snipped corner. Then, I piped the foam onto the packages into different shapes and sprinkled them with glitter. This is my first time using this technique and the foam puffed up quite a bit when drying. I am unsure how it will hold up over the next couple of weeks but my daughter’s project on the fridge looks great!
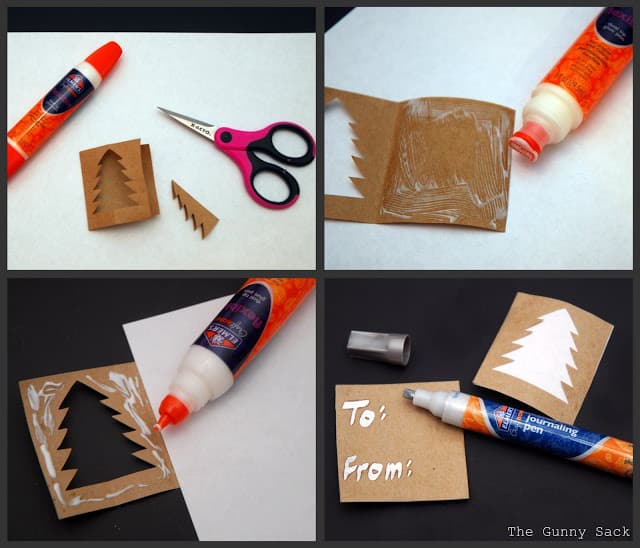
I also made gift tags to go with the presents. I cut out rectangles of kraft paper and then cut a shape with the X-ACTO Precision Tip Scissors. I glued a piece of white paper in the middle of the tag. I used the wide tip of the Elmer’s CraftBond Flexible Glue Pen for the complete side and the narrow tip for the cut side. Then, I wrote To and From on the back of the tag with a silver Elmer’s CraftBond Journaling Pen.
Using the Elmer’s CraftBond Sparkle Glue Shimmer, I added the silver glitter to the tags and the snowman.
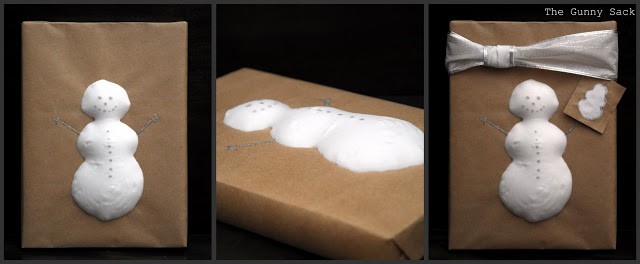
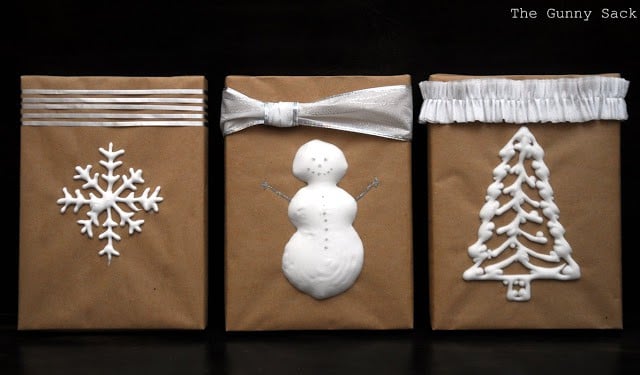
The snowman puffed up even more over the night! I added a wide silver ribbon to the top and a gift tag.
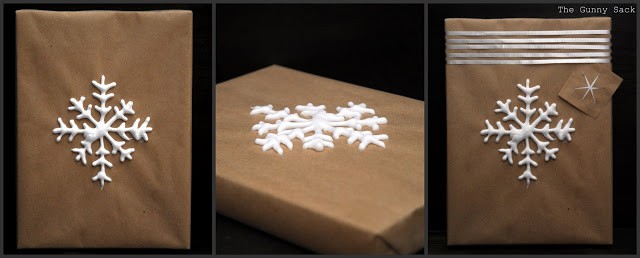
The snowflake shape had a couple of blowouts but it is still adorable. I added 5 small strips of ribbon and a gift tag to the top.
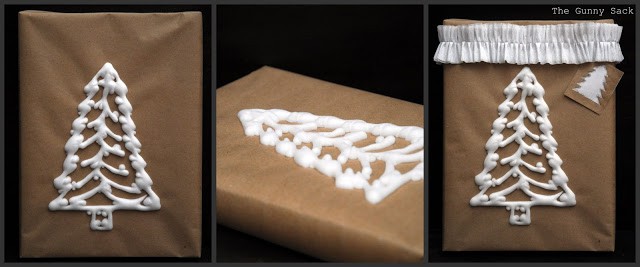
The tree has several mini blowouts! I think the outer layer dries and the inner layer continues to expand but I like the look! I added ruffled white streamers to the top of this package along with the tag.
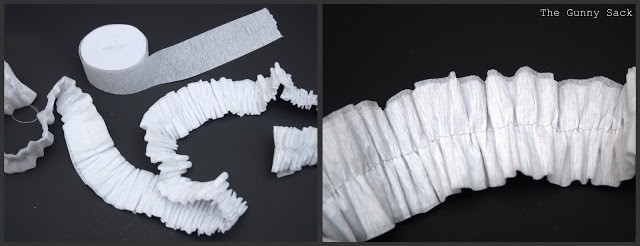
To make the ruffle, I sewed 3 strips of streamers together, letting my machine do the work by turning my tension to the highest number and my stitch length to the highest number (see Made for a tutorial).
I love how they turned out and now I need to work on the rest of the gifts!
Are you gifts already wrapped? My son just informed me that he likes gift bags because he can get to the gift faster!
Home Cooking Memories says
That looks totally cool! Pinning on Pinterest to save for next year!
Kim @ Too Much Time says
These ideas are so super cool!I would love if you stopped over to link it up at Get Schooled Saturday a Too Much Time on my Hands!
http://kim-toomuchtimeonmyhands.blogspot.com/2011/12/get-schooled-saturday-3.html
Holly Lefevre says
That is so fun! I love the shaving cream/glue effect! I am busily wrapping my Elmer’s presents right now (you just might see some Kraft paper too!)
folkhaven says
Thanks for coming over to my blog to answer my question. I don’t know why my email link didn’t work, but I appreciate you going to the effort to track me down and give me an answer!
Cori says
So cute! Will you please add it to my Handmade On Humpday link party?
http://createdbycori.blogspot.com/2011/12/handmade-on-humpday-5.html
I’m your newest follower!
Ruth says
I love this idea. The 3-d elements with the ruffled crepe paper are awesome.
Ruth
folkhaven says
What a great effect! I’m curious how durable the “puff paint” is. If I put it on packages I wrap before I travel, would it survive the car trip in a bag with other gift boxes?
Living in La La Land says
I love it Tonia! The ‘blow outs’ give them character!
I now want/need puffy packages;)
Jennifer @ Delightfully Noted says
I would have never thought of this! Such a neat idea for kid’s packaging or a great activity for kid’s to do!
Christina at I Gotta Create! says
I love wrapping gifts, too, Tonia and this is a perfect technique for winter! Thanks for sharing… I’ll have to try it. Pinning it!
Chas says
What a great idea! I can’t wait to try this! I would love you to share this at my Shades of the Season party.
http://onewomenshaven.blogspot.com/2011/11/easy-peasy-mason-jar-snowmen.html
Artsy VaVa says
Your packages are great! Anyone who receives a gift from you will certainly have a hard time throwing the wrapping away! Maybe they can frame them!!!
Katie says
Cute packaging!!! I love the 3D gift wrap idea!
Maggie @ Midwestern {Sewing} Girl says
This project is awesome, Tonia! Those packages are gorgeous!
Lindsay says
So adorable! You have the BEST ideas here. Seriously! I love seeing all the creativity that you bring each week! Thanks for sharing!
Michelle says
This is the coolest idea I’ve ever seen! I LOVE the snowflake. I’d love for you to come link up at DIY Thrifty Thursday @ http://www.thrifty101.blogspot.com
Michelle @ Thrifty 101
Amy @ As The Bunny Hops says
I’ve never done the glue and shaving cream trick before-it looks like tons of fun!
SocialStudiesSoubrette says
WOW! I love this craft. What a cool way to present a gift to someone special 😀
Rebecca E. Parsons/Cre8Tiva says
glue and shaving cream…oh my i have ideas…love them Tonia!!!
Carolyn says
How cool is that. Gonna go try it.
Kathy says
Those are super cute – so simple. I bet they feel kind of boing – y! I agree with your son about the gift bags though : )
Amy @ The Mom Hood says
Wow, those are way cool! My 10 year old would love to make these, so much fun!
The Answer Is Chocolate says
SO cute Tonia. I love kraft paper wrapping…so many possibilities and genius…never knew about shaving cream and glue!
BettyJean @ Shabby Tea Party says
Super Cute…..please share at my Wednesday Wrap Party. Warm Hugs,
Gwen @ The Bold Abode says
That is wacky! And Oh-so-cute! I love your crepe paper ruffle, too.
Anne @ Domesblissity says
Tonia, these are adorable. I think that idea of mixing the shaving cream with glue is amazing. You’ve given me an idea for a holiday craft activity. It’s about the only ‘snow’ we’ll get to look at this Christmas! LOL
Anne xx