
Here’s How To Make Brown Bag Envelopes for shipping packages or for wrapping gifts. These custom envelopes are cheap, easy to make, and will stand out!

As you already know, I have an Etsy store but I also sell stuff on eBay occasionally. As you can imagine, at times, I am doing quite a bit of shipping.
The cost of the shipping supplies such as envelopes, boxes, tape, labels, and bubble wrap can really add up.

I have heard of people making their own mailing envelopes and I really like the idea of having custom packaging stands out to my customer as being different and makes a lasting impression on them.
So I decided to make my own custom brown paper envelopes with colorful stitching around the outside.
How To Make Brown Bag Envelopes
Disclaimer: This post contains links to products for making this recipe. If you use those links, I may earn a commission. Learn more here.

Step One: Brown Paper
It starts with the lowly brown paper bag if you have any available. This is the cheapest option because it is free.
The second option is to purchase brown craft paper that you can use to make multiple envelopes.
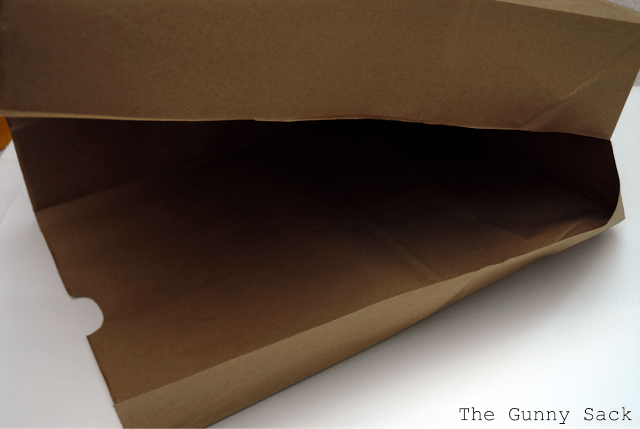
Step Two: Open Bag
If using a brown paper bag, you’ll need to cut the bag open so that it can lay flat. Cut down the side of the bag and then cut off the bottom.
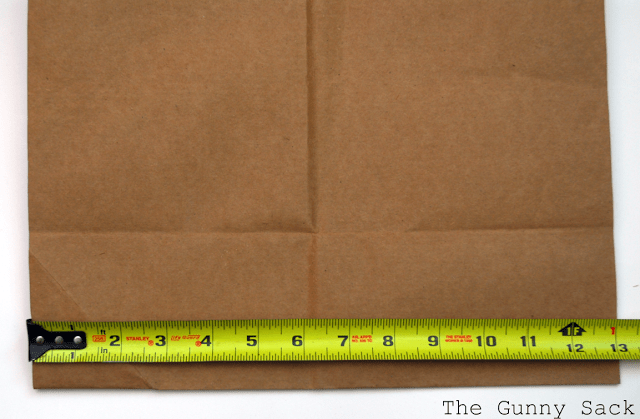
Step Three: Measure
Fold the bag in half and lay flat. Measure and trim the bag so that it the right size depending on what you are shipping. I was shipping men’s shirts so I did 13×17 inches.

Step Four: Make A Flap
Fold back one side of the paper a few inches. This will be the opening of the envelope and it creates a flap that can fold over.
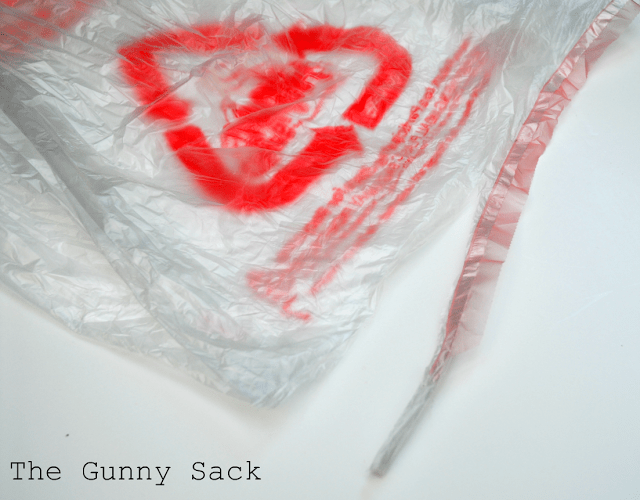
Step Five: Lining
To reinforce the bag and to make it water-resistant, line it with plastic. The cheapest option is to use a plastic grocery sack that you already have on hand.
Another option is to purchase a roll of plastic sheeting that can be used to make multiple envelopes.
If using a plastic grocery bag, cut the bottom off so that the plastic can be laid down flat.
If using plastic sheeting, cut two pieces of plastic that are slightly large than the brown paper pieces.
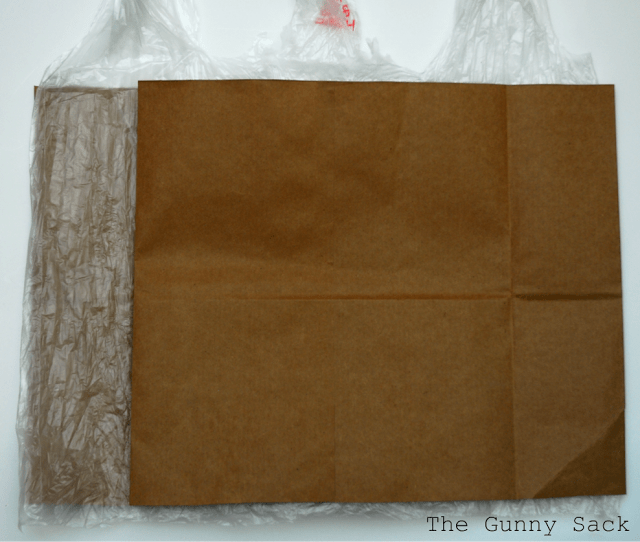
Step Six: Assemble
Spread the plastic bag (or plastic sheeting pieces) flat and lay inside the trimmed brown paper bag.

Step Seven: Sew
Sew around the perimeter with a contrasting thread in a wide, narrow zig-zag stitch. Reinforce the start, the corners, and the end.

Step Eight: Trim
Trim the extra piece of plastic from around the brown paper envelope and from the opening.
Step Nine: Label
Print out a custom label with your logo on it and tape it to the envelope.
Don’t the envelopes look so unique and cheerful with the colorful stitching around the edges? These envelopes could also be used to wrap gifts for birthdays or holidays.
Once you learn how to make brown bag envelopes you’ll think of so many ways you can use them!

Looking for More Paper Bag Tutorials? Try These Next:
Use brown paper bags to make Al Fresco Dinnerware Packets to hold a napkin, plasticware, and a straw for parties, weddings, celebrations or for a picnic.
White paper bags make fun Hole-y DIY Gift Bags that can also be used as Easter baskets! Add colorful tissue paper or paper grass that will show through the holes in the bag.
Printed Brown Paper Lunch Bags are the EASIEST way to make pretty, customized bags that can hold a lunch or be used as treat bags or party favors.
Ginger@gingersnapcrafts says
Very smart! 🙂 Following from I Heart Naptime link party. Would love to have you link this up to my {wow me} wednesday link party going on right now over on my blog {if you haven‘t already!}. Hope to see you there.
Ginger
gingersnapcrafts.blogspot.com
Jaclyn says
This is such a great Idea I love it!! =) Now I just have to start asking for paper bags!! I was browsing your Etsy store and I saw that your from Minnesota =) I live in Minnesota too! Not near the cities a few hours north, but its always fun to find someone that lives in the same state! =) I am your newest follower!!
thepaisleytab says
Great idea! 🙂 Thank you for sharing!
Jen says
Wow – what a great idea! And so simple!
Lolly Jane says
ps: new follower 😉
Lolly Jane says
this is darling, seriously…super creative. love it. thanks a mil for linkin up to Whatcha Got Weekend! XOXO
dana @ wonder forest says
this is an amazing idea! love the look of it!
xo dana
thewonderforest.com
Sachiko says
You are so clever! I love this idea. Thank you for sharing your talent with us!
Chiara says
Darling post. I love the idea of the special, individualized envelopes! I shared this post on my Friday Favorites for tomorrow. Thank you for sharing the great idea. I am excited I found your blog–just became a follower!
malia says
newest follower ( -:
malia
malia says
how clever and fabulous! Love it! malia
Ms.Alethia says
I LOVE this idea!
Catherine says
What a great idea! Looks awesome!
Life In The Thrifty Lane says
Genius idea!! Love it 🙂
Margaret says
fantastic Idea. Thanks so much for sharing- I never would have thought of that.
June@I will craft says
Great idea when you need a custom sized envelope or just want to do something different. The plastic liner is a great idea and I’m sure it helps the items arrive safely.
btanders says
What an awesome idea! I LOVE going green! And, I never seem to have those large envvelopes on hand!!
poindextr says
What a clever and adorable parcel envelope! I’m all about making my own regular envelopes but never considered anything on a larger scale. I especially like how you have lined yours. It’s fabulous!!
Michelle @ Loving Every Second says
Such a cute idea! I love buying handmade – how fun to receive a handmade purchase in a handmade envelope!
Visiting from Inspired by You Wednesday 🙂
craftystaci.com says
This is a great idea…thanks for sharing it!
Evan Becky says
Wow! That is such a great idea! I love it. I may be trying this in the future, though I’ll have to find the time. Thanks for posting.
Nike@ChooseToThrive says
Another crazy good idea! I don’t think I’ll be able to buy shipping envelopes again – this rocks!
www.StarHughes.com says
Another genius idea! I love that it differentiates yourself. And it’s always soo much fun when you order something in the mail and it comes in such cute packaging! Great job!
Lizard Rae says
Genius! Genius! Genius!
Shore Girl says
GREAT idea!! Thanks so much for sharing.
Jessica says
This is very cool, I love this idea!
Randi~Dukes and Duchesses says
Fabulous! I would be so happy to have one of those arrive in the mail!
Danielle says
this is a great idea – very unique and a good way to stand out! thanks for visiting my blog and commenting – means the world to me 🙂
Just Jaime says
Great idea! I love the stitching!
Princess of Everything (and then some) says
Brilliant! I really like this. Plus I love how you are re-using something!