
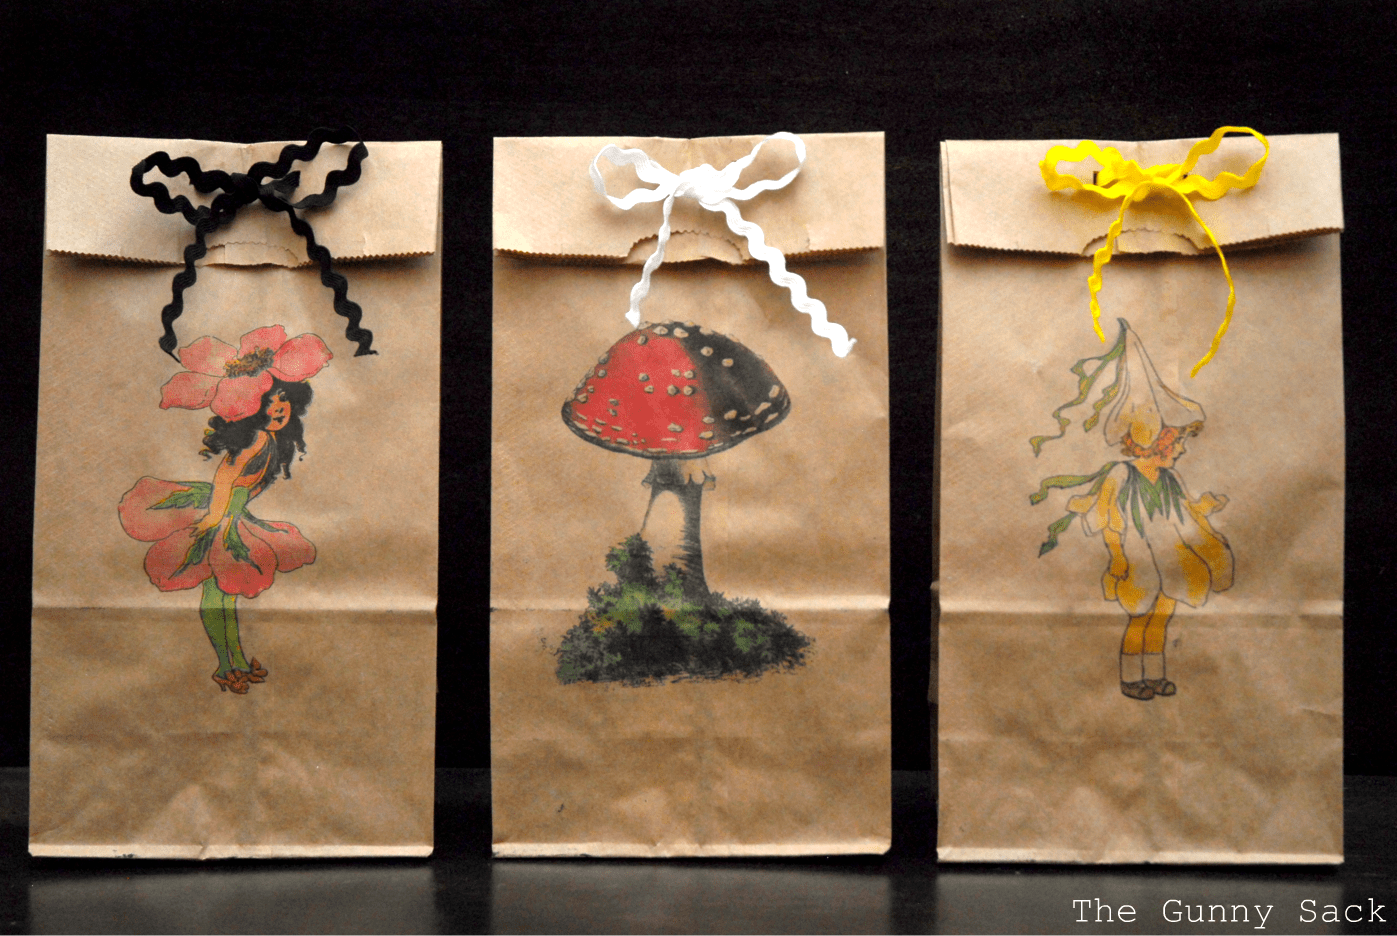
Yes, I realized that brown bagging isn’t as environmentally friendly and yes my kids do have reusable lunch bags. That being said we also use plenty of brown paper lunch bags.
As part of the {handmade} Back to School series, I made a tutorial for printing your own graphics onto lunch bags. A friend of mine printed onto bags last Christmas and I thought that was such a great idea!
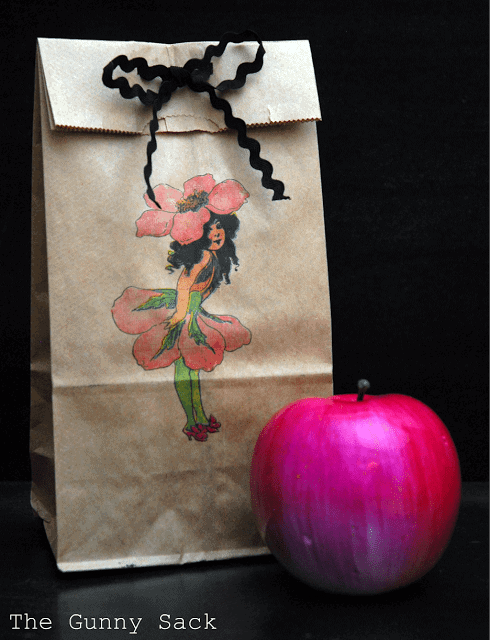
Create your printable in Word by changing the page size to what ever your bag size it. I set mine at 5×10. Then insert the graphic of your choice and position it where ever you want it.I found these images on Graphics Fairy but you child may be into cars or Pokemon or dogs. Use whatever your child likes.
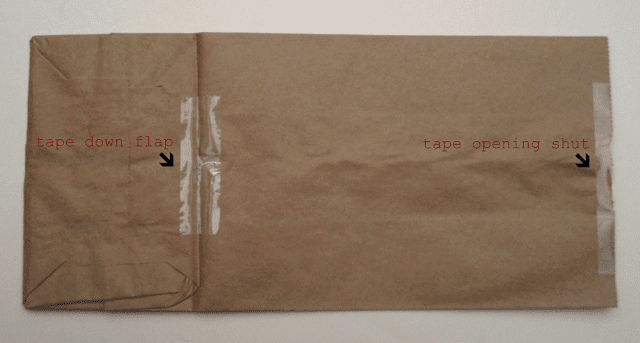
Tape the flap down and the opening shut. I tried printing several different ways before trying to tape it and the bag kept getting jammed in the printer. This helps prevent that.
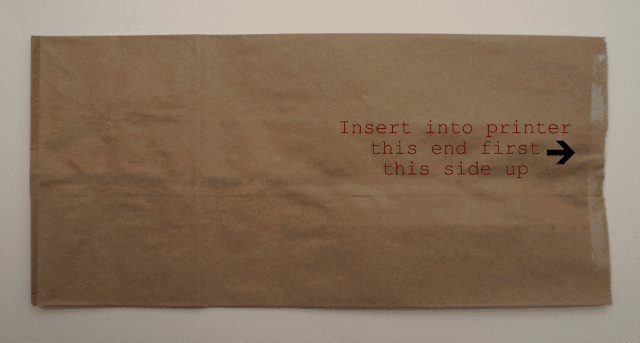
Insert the taped bag into the printer. Put the end with the taped opening into the printer first and make sure the taped down flap is face down.
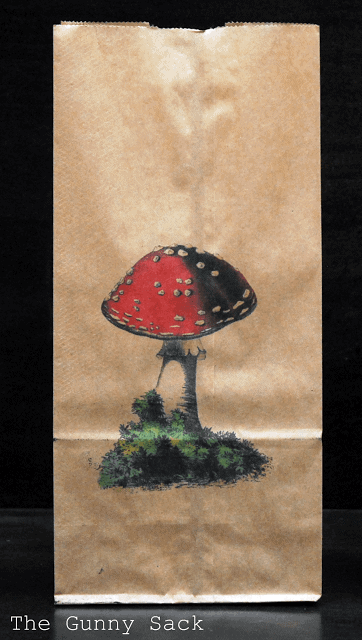
After the image is printed, gently remove the tape.
Since you have nothing but time on your hands, punch 2 holes and thread rick rack through them to close the bag. Or just roll the top down and call it good.
These would also make great treat bags and you could do a graphic that fits with the party’s theme!
WesTXGrl13 says
This is *A*W*E*S*O*M*E*!!!!!!!!!!! We are hosting a baby shower in a few weeks, and I can see these paper bags sitting on the tables with a picture of the happy parents-to-be showing off the “baby bump”!!! A tea light inside to make them glow! Thank you for stretching my imagination–besides the thought of printing on a paper sack, I just figured out that I can customize the height and width of a piece of paper. I thought I could only use the (ample, but not what I needed) choices that are pre-programmed in Microsoft Word, but found out that I could fix them however I wanted! Derp! Some of us are kinda sloooooooow in discovering these things!!! I learned to use a computer back when they were totally NOT user-friendly, and have had to teach myself new tricks “by guess and by golly”! Thank you so much for a great tutorial!!! The possibilities are endless!!!
Krystal Wells says
What style and model printer did you use? Inkjet, laser print?
Tonia says
Hi Krystal,
I’m sorry that I didn’t post that information at the time. This blog post is from 2011 and I don’t remember which printer I had at that time, but I do know that it was an inkjet printer.
~Tonia
Crissy says
If anyone has had success with this project, could you please tell me what model and brand printer you used? I am in the market for a new one, and I want to be sure it can print on brown paper bags. Thanks in advance
Tami says
Love this! It would look really pretty on white paper bags too. I can’t wait to try it! Magpye, good idea on flipping the pic & skipping the tape!
Tonia L says
Thanks Tami! I actually bought some white paper bags for that exact reason but haven’t had a chance to do it yet!
magpye says
In most word processing programs you can flip the image upside down. Then you could feed the bag bottom in first and you should be able to skip the taping and untaping. I love the idea and will do this for my daughter’s next birthday goody bags for her guests!
Miki's scrapbook says
What a great idea! 😉 Hope you’re having a great long weekend! ;D
Miki.
Leah says
I LOVE YOU!! So I have my first craft fair coming up in less than two weeks and I realized I hadn’t even approached the idea of bagging sold items. Money is very tight and now so is time. I wanted to do something cute but cheap and quick. THIS IS AMAZING!!!
Debbie says
Leah..I was thinking the same thing! inexpensive yet professional looking!
Kyra says
This comment has been removed by a blog administrator.
brattymelai says
I’ve got tons of brown bags and this post gave me loads of ideas!!! 🙂
I mentioned you on my blog, http://feileacangirl.blogspot.com/2012/05/do-it-yourself.html , hope that’s fine with you.
Kudos! xx
MD Mimi says
I just stumbled on your site thru Pinterest and I am a very happy FAN!!! Amazingly (if thats a word) you have found time to make a fun site while being a mom to three and doing all the other stuff too! Thank you!
Sue/Mimi
Ashley says
This comment has been removed by a blog administrator.
The children's mum... says
I wanted to bag up some homemade chocolate chip cookies for the kids in my sons class. Now I have printed some brown paper bags with a small clip art picture of cookies and my sons name so they know what they are and who they are from! Looks so much nicer than a plain bag or handwriting (with my ATROCIOUS handwriting)… Thanks for the brilliant idea!
Kim from Maiden D'Shade says
So clever! I love this!
Katie says
LOVE the customized lunch bags! My mom always use to draw on mine and leave a special unique note in it each and every day!
Thank you for linking up to Sew Woodsy last week. We hope you’ll join us again this week for another edition of What’s Up Wednesdays!
BigBearswife says
LOVE this idea for party treat bags!
Jenn Erickson says
They’re absolutely beautiful! I love the vintage graphics and your tutorial is perfect.
Feel free to link-up your post to my ongoing Back-to-School blog hop. It would be a welcome, quality addition!
Jenn
sherri lynn says
These are SO cute! I always liked having a brown bag instead of a lunchbox when I was in school – I would have totally loved these!
Maggie @ Midwestern {Sewing} Girl says
Just perfect! As usual…;)
Anne @ Domesblissity says
Tonia! When do you actually have time to do anything else? You’re a wonder woman! All these fantastic ideas. I’m lucky I’ve got a fussy eater and she won’t eat from the school canteen. I haven’t had to send a brown paper lunch bag to school in 18 months! LOL I have used them for birthday parties, printing a colouring image on the bag and filling with treats and a few colouring pencils for a treat bag.
You’re just amazing.
Anne xx
Lindsay @ Delighted Momma says
Tonia this is SO adorable!! I love the one with the little mushroom on it. CUTE